A&S Research Paper #31: “The Invisible Parts of Embroidery”

Our 31st research paper is a collaborative project from Amalie von Hohensee and Scolastica Capellaria.
It comes from entries that both artisans presented for a research challenge at the Laurel’s Challenge & Exhibition online event in May of 2021. This challenge asked artisans to explore one of those interesting “rabbit holes” that they often come across while doing research. Artisans were encouraged to take some time to find joy in pursuing an interesting or unexpected idea. Both of our artisans choose to research the different ways that late period European embroiders transferred designs onto fabric.
Amalie focused on the “prick and pounce” method while Scolastica spent her time investigating the use of ink for pattern transfer, even going so far as to experiment with different types of ink! Read more about Scolastica’s experiments on her A&S Blog. For a combined overview of the use of these two methods written by both artisans, please read on.
A Collaboration on the Invisible Parts of Embroidery
“Down the Rabbit Hole” Laurels’ Challenge 2021
Amalie von Hohensee & Scolastica Capellaria
When an SCA artisan begins a new project, we often ask ourselves a few basic questions to help set ourselves on the path towards greater historical authenticity. Two key questions are: What did they use in period? And how did they do it? This research project tackles the steps that an embroiderer takes prior to ever making a stitch in the fabric. These steps are often unseen and invisible in the finished project, but are integral to the design. This paper will examine the methods of transferring a design to fabric, including both a discussion of period texts on the subject and a practical look at the materials used in Europe from the 14th through the 16th century.
Cennini and the Use of Ink for Pattern Transfer
Looking at the complex, colorful, and often gilded embroideries of the thirteenth through sixteenth centuries, it is easy to forget that underneath all those beautiful silk stitches is a linen or silk canvas. But this canvas was not blank; it would have included a line drawing which worked as a guide for the stitcher. In order to try to recreate historical embroidery techniques as closely as possible, including how the embroidery pattern was transferred onto the fabric, we first turned to Cennino Cennini’s Il Libro dell’Arte, published around the turn of the 15th century, for advice. Although Cennini was writing in the 15th century, Museum of London historian Kay Staniland believes that the techniques he describes were used at least a century earlier (Staniland 23). We therefore used this text as a source for possible pattern transfer methods in late middle ages and early Renaissance periods.
Although Cennini’s manual is intended for artists and painters, he does provide a few tantalizing bits of information concerning marking textiles, including one section that specifically refers to embroidery. It is important to note here that Cennini’s intended audience provides an interesting insight into embroidery practices of the time: namely, that artists, not embroiderers, were expected to create and mark the designs that would be embroidered. While the advent of the pattern book in the sixteenth century, as will be discussed below, did in some cases eliminate the need for an artist to create and mark the ground cloth for the embroiderer, professional painters and draftsmen provided both designs and pre-marked embroidery fabrics up to the sixteenth century and beyond (Staples 29).
Cennini’s instructions on creating patterns for embroiderers are brief. First, he stresses the importance of stretching the fabric ground before attempting to mark on it, and mentions this not only in the context of embroidery, but also when giving instructions for painting on silk or linen (103, 105, 106). Our practical experimentation has borne out the necessity of this step, and it provides two major benefits. First of all, stretching the fabric prior to marking prevents distortion of the design that would occur when hooping or otherwise mounting the fabric, and second, it provides a taught work surface that makes marking with charcoal or a quill pen much easier.
Cennini’s next instructions to the artist are to first draw their design freehand in charcoal onto the stretched fabric, and then to reinforce the charcoal drawing with ink, brushing off the charcoal afterward (105). He details a method by which the artist can create shading and depth by dampening the cloth and painting on it with a brush and ink. This step seems to indicate that the artist was providing not just an outline for the embroiderer, but an entire underpainting, complete with shading. This would have been an invaluable asset especially for those embroiderers hired to create the complex figurative embroideries often seen on ecclesiastical vestments, which feature lavishly detailed garments filled with complex shading.
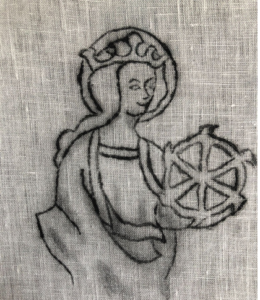
This process of creating a detailed, shaded drawing on a canvas is part of a larger process known as underdrawing. These under drawings are used by artists in many fields to create a guide for painting, sculpting, or in this case, embroidery. In painting, underdrawings are used as a preliminary sketch that is built upon over time. We know from extant textiles whose stitches have worn away such as the Hildesheim Cope (1310-1320) that embroiderers worked on fabric with an underdrawing. The cope was likely produced in a professional medieval embroidery workshop, but later embroideries such as this Coif from around 1600 at the Victoria and Albert Museum also reveal underdrawings where the stitches do not cover the ground fabric.
Modern embroiderers are also familiar with this technique of drawing a design on their fabric prior to stitching, as they often use archival ink pens or water soluble markers to create line drawings on their fabrics. But as Cennini noted, medieval underdrawings for embroideries included shading painted on with diluted ink.

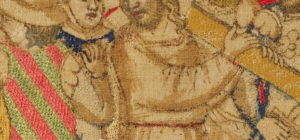
This underdrawing would act as a guide for the embroiderer to create shadows and three dimensions with different colors of thread. Christ Carrying the Cross, a mid-14th century embroidery at the Metropolitan Museum of art is a great example of the use of an underdrawing in an embroidery. The embroidery that once covered the body of the central figure has worn away, revealing a sharp outline and extensive shading.
While Cennini mentions that artists used ink to paint the designs, he fails to elaborate what kind of ink embroiderers used for their under drawings when drawing designs on fabric. Our first thought was to experiment with an ink similarly used for writing in manuscripts. The most popular, permanent calligraphy ink used in medieval times is known as Iron Gall Ink. This ink is made from “nut-like swellings called galls” containing tannic and gallic acids which when mixed with an iron salt create a beautiful blue purple black ink (Thompson 81). When exposed to air, the oxidation of iron sulfate turns the ink dark black. This ink is ultra-permanent and great for working on parchment.
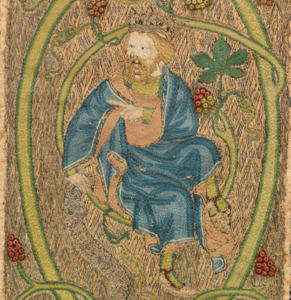
However, Iron Gal Ink is corrosive to cellulose based materials like paper and linen. If the correct chemistry is not achieved in the creation of the ink, there will be unbound Fe (iron) ions which cause the materials to degrade and crumble (Rijksdienst voor Het Cultureel Ergoed). For practical purposes, the risk of degrading the fabric with corrosive ink like this is too high. In fact, period embroideries often show evidence of corrosion where black inks or dyes have been used, such as the missing shoes on the figure in th 14th century English orphrey pictured below.

While the process of ink corrosion can take hundreds of years to show itself, medieval artisans were aware of its effects on silk and other fibers. In the late 14th century the Doge of Venice, a leader in textile production, prohibited the use of Iron Gall dyes in textiles due to the swift degradation of the fabrics (Lemay).
Thus we believe the ink used for embroidery underdrawings was likely a black pigment suspended in a binder such as lamp black, vine charcoal, or ivory black. Because an under drawing does not require ultra-black lines, lamp black or vine charcoal were likely the pigments used. Lamp black is made by collecting soot on a metal surface over an open frame. Vine charcoal is referred to in Medieval texts as nigrum optimum, or the “best of blacks” (Thompson 85). Vine charcoal is made from burning young grape vines and produces a very fine consistent pigment. Lamp black produces a very cool toned black, while vine charcoal is warmer or yellow tone, and Ivory black (made by charring ivory) is a much warmer black. These differences are indistinguishable to the naked eye and likely did not factor into medieval pigment choices. Regardless of the type of pigment chosen, The pigment would be ground into a fine powder and then mixed with a binder which suspends the pigment into a liquid and adheres the pigment to the ground.
Artists in medieval and Renaissance Europe had several binders to choose from. Pigments could be suspended in gum, egg, rabbit skin glue or oils (Thompson 57-73). Many of these created a sticky or glossy varnish which we don’t need in our under drawing for embroidery and could prevent the needle from penetrating the fabric while stitching. Additionally, Cennini’s shading process uses water as a medium to shade the pigments, and therefore it is likely the process he describes uses a water based medium. Gum Arabic, a sap collected from the Acacia tree and is used as a modern binder for watercolors. This binder was the most common binding media for pigments in manuscript illumination and was used in Iron Gall ink recipes to create a smooth and glossy ink (Kroustallis 108).
The Prick and Pounce Method
In the late fourteenth century, we begin to see more repetitious designs for embroideries. These often came in the form of embroidered appliques that would be purchased by religious institutions individually and collected over time to be added to different religious vestments. To create these repetitions more efficiently, a method of pattern transfer known as the prick and pounce method would be used. For this method, the final design would be drawn onto a piece of parchment. Then, thousands of tiny holes would be pricked along the design using a sharp instrument. This parchment would be placed on the canvas at the correct location for the design. The artisan would then powder the surface of the parchment with charcoal so that it colored the canvas below through the holes. And finally, the artisan would connect the dots with ink to make the drawing permanent.
The prick and pounce method of pattern transfer was not exclusive to historical embroiderers. Renaissance painters also used this technique to transfer their cartoons to the final work surface (Bambach xi). This was especially advantageous for fresco painters, since that medium dries rapidly, and therefore the painter needs a quick way to accurately transfer their painting outline to the work surface. As a result, sources that discuss Renaissance painting workshops are actually excellent resources for the history of this technique. Carmen Bambach’s Drawing and Painting in the Italian Renaissance Workshop provides a fascinating discussion of pattern transfer methods in this context, and spends a good deal of ink detailing the technique of prick and pounce, known in Italian as spolvero (xi).
The term spolvero, however, can be confusing when consulting pre-fifteenth century artists’ manuals. Spolvero can also refer to the practice of spreading a powdered substance all over a piece of parchment in order to even out the surface and prevent ink from spreading (28). Cennini is actually the first author to discuss this term in the context of pattern transfer, though he also makes reference to the term in the context just described (28). Interestingly, although Cennini does spend some time giving artists instructions on how to create designs for embroiderers, he does not reference spolvero in those instances, but instead uses the term when describing how to transfer a repeating design. The use of this technique for repeating designs makes great sense, especially since it allows for a less skilled artist, perhaps an apprentice in a workshop, to execute the tedious task of transferring a repeating pattern with accuracy.
Although artists and painters used this technique frequently, some of the best accounts of the process actually come from early embroidery manuals, and Bambach references their writings extensively in her survey of the topic. Two such authors are Alessandro Paganino, who authored Il Libro Primo de rechami in 1527 and Giovanni Antonio Tagliente, whose Essempio di recammi was published that same year. Cennini, Paganino, and Tagliente all provide details on how to execute the technique. Cennini recommends placing a buffer such as canvas or cloth behind the parchment that will be pricked to prevent it from tearing, and to use charcoal dust when working on a light surface and powdered white lead when working on a dark surface (Bambach 57, Cennini 87). Paganino instructs the copyist to use a thin needle and prick all the way around the design, spacing the holes close together. He also recommends sanding the reverse side of the parchment to get rid of any excess parchment, which helps to create a cleaner transfer (Bambach 57-8). Tagliente describes folding the parchment to be pricked in half in order to get the mirror image of the pattern imprinted on the parchment (Tagliente 8). In addition, Bambach notes that the pounce powder was likely held in a small linen bag; a loose weave was crucial to allow the pounce to transfer properly (77).
Paganino’s and Tagliente’s books are part of the larger pattern book tradition that was spreading throughout Europe and England during the first half of the sixteenth century. These pattern books could be used for a variety of disciplines – metalwork, furniture, textiles, etc. (North 43). The first embroidery-specific pattern book was published in 1523 (Carey 48). Extant pattern books contain evidence that they were pricked and pounced; there is a copy of Jacques Le Moyne’s 1586 pattern book La Clef des Champs in the British Library with pin pricks in it (Carey 48). These designs were eventually destroyed with repeated use, so the pin pricks that survive in extant books may have been transferred to a piece of parchment before they were transferred to an embroidery piece (Carey 63, North 43). The ability to transfer these pattern book designs precisely with the use of pounce allowed non-painters to access embroidery designs themselves directly, rather than having to hire a professional pattern designer to draft designs. This paved the way for the robust culture of domestic embroidery that sprung up in the sixteenth century.
Prick and pounce was not solely used by amateur or domestic embroiderers, however. As mentioned above, this method allows for the easy application of repeating designs, which was valuable to the embroiderer’s workshop as well as the artist’s. In addition, it also allowed for the same design template to be reused across several different commissions. In a paper comparing two panels on the Whalley Abbey altar frontal, a work of late fourteenth or early fifteenth century English embroidery, textile conservator Leanne Tonkin describes how the same basic figure design can be seen on two sections of the embroidery. The embroiderer used different colors to fill the figures, and the female saints hold different objects in each panel, but the figure outlines and the architectural elements are identical. This suggests that some kind of stencil was likely used to reproduce the design (88). The Statens Historiska Museum of Stockholm contains an extant piece of pricked parchment from c. 1490 portraying a saint or Biblical figure, which further supports the use of pouncing for ecclesiastical embroidery (Wetter 96). These design “shortcuts” became necessary as the demand for embroidered vestments increased during the latter half of the fourteenth century. Indeed, some historians have associated this time-saving technique with the decline of the famed Opus Anglicanum embroidery of the previous century.

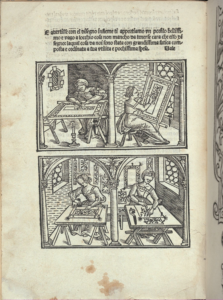
Paganino’s book includes a fascinating woodcut that helps to further elucidate period pattern transfer methods by providing illustrations of four different period approaches. The upper two images involve the use of a light source: a candle in the first and a window in the second. Presumably, the image being copied has been placed on the reverse side of the embroidery. The lower left hand figure is pouncing a design, and the lower right hand figure is drawing freehand from a pre-existing design. This fourth picture also potentially illustrates a unique facet of pattern books that developed in the later sixteenth century, when pattern books began to include grids, which would allow the copyist to scale the design up or down with the use of a corresponding larger or smaller grid (North 48).
In all four images, the embroidery ground is held taught in some way – stretched in a frame in the upper two images, and apparently nailed to a table in the lower two. The copyists also appear to be drawing with a quill (aside from the one figure holding a pouncing bag). As mentioned above, stretching the ground fabric before marking allows a pen or quill to run more smoothly over the fabric surface, which is rougher than paper.
So, how does this help the modern embroiderer? While Cennini’s method of drawing freehand directly onto stretched fabric may be too intimidating for most embroiderers, the adventurous artist can certainly give this option a try. Cennini’s recommendation of using charcoal and ink, however, can translate into tracing with a pencil or felt-tipped pen. The simple use of a light source, as illustrated by Paganino, demonstrates that the modern embroiderer may simply use a lightbox or window to help transfer their designs – a method that is already tried-and-true to many embroiderers.
Prick-and-pounce is well known amongst modern embroiderers aiming to use historical methods in their work. In fact, prick and pounce is one of the techniques taught by the Royal School of Needlework as a part of their embroidery certificate program, and is used by many professional modern embroiderers. It is our hope that this brief historical survey will equip the modern historical embroiderer with the basic knowledge necessary to choose the methods that will best suit their chosen project. However, as Cennini pointed out, embroiderers were not painting these designs on themselves; instead, they brought their canvases to artists to draw for them, and then they covered them in beautiful stitches. This is a reminder that not every artist needs to have all of the tools in the toolbox, and that even in medieval times, different types of labor on a project were shared by different types of laborers. Embroiderers do not fret! For there are painters to paint your designs!
